Let me start with a little confession: dulce de leche was not part of my childhood. I didn’t grow up with a grandmother stirring milk and sugar on the stove while soft music played in the background. I wish I did—but that’s not my story. My first real encounter with dulce de leche happened much later, during my college years, when a friend returned from Argentina with a tin tucked into their suitcase like it was contraband. One spoonful in, and my brain basically short-circuited. I remember thinking, How is this even real?
From that moment on, I was obsessed. Fast forward a few years, and now I’m the person who always has a can of dulce de leche in the pantry “just in case.” And more often than not, that can turns into these Dulce de Leche Squares—my ultimate go-to dessert when I want something that feels luxurious but doesn’t require hours in the kitchen.
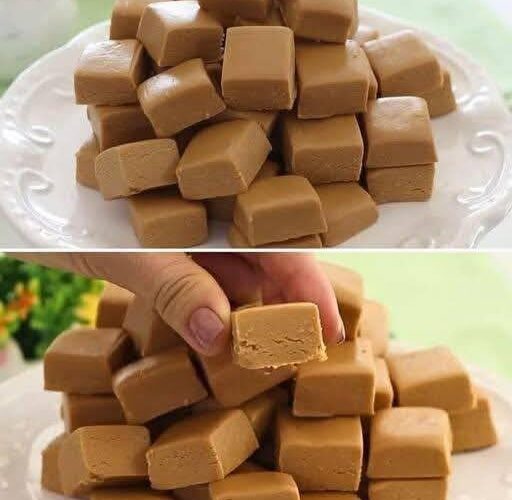
These bars are chewy, buttery, rich, and dangerously easy to eat. They’re the kind of dessert you cut into neat squares… and then somehow keep going back for “just one more.” You’ve officially been warned.
What Are Dulce de Leche Squares?
If you’ve never had them before, let’s break it down in simple terms. Dulce de Leche Squares are dessert bars with a tender, shortbread-style base topped with a thick, creamy layer of dulce de leche. That’s the foundation—but from there, you can take them in all kinds of delicious directions.
Some people add a crumb topping. Others drizzle melted chocolate over the top. A lot of folks sprinkle flaky sea salt to balance the sweetness (highly recommended, by the way). No matter how you customize them, the result is always the same: a rich, satisfying dessert that tastes like it took way more effort than it actually did.
Dulce de leche itself is often described as caramel, but smoother, milkier, and somehow even more indulgent. It’s traditionally made by slowly heating sweetened condensed milk until it turns golden and thick. You can make it from scratch at home, but you can also buy it ready-made—and for this recipe, both options work beautifully.
Why This Dessert Works Every Time
There’s a reason these squares are such a hit, especially with dessert lovers who appreciate bold, comforting flavors:
- They’re incredibly rich and satisfying. A small square goes a long way.
- They’re sturdy. These bars travel well, making them perfect for potlucks, bake sales, and parties.
- They look impressive. People assume you spent hours making them.
- They’re beginner-friendly. No fancy techniques or equipment required.
Basically, they check all the boxes.
Ingredients You’ll Need (Pantry-Friendly and Stress-Free)
One of my favorite things about this recipe is how simple the ingredient list is. No obscure items, no specialty tools—just classic baking staples.
For the base:
- 1 cup unsalted butter, softened
- ½ cup granulated sugar
- ¼ teaspoon salt
- 1 teaspoon vanilla extract
- 2 cups all-purpose flour
For the topping:
- 1 can (13–14 oz) dulce de leche
Optional extras:
- Flaky sea salt
- Mini chocolate chips
- Chopped pecans or walnuts
- Toasted coconut
The optional toppings are where you can really make these your own. I personally love a generous pinch of flaky sea salt—it cuts through the sweetness and makes the flavors pop. But honestly, you can’t go wrong here.
Step-by-Step: How to Make Dulce de Leche Squares
This recipe is refreshingly straightforward. Think of it as a “mix, bake, spread, chill” situation.
1. Preheat and Prepare
Start by preheating your oven to 350°F (175°C). Line an 8×8-inch baking pan with parchment paper, leaving some overhang on the sides so you can lift the bars out easily later.
2. Make the Shortbread Base
In a large bowl, cream together the softened butter and sugar until smooth and fluffy. Add the vanilla extract and salt, then gradually mix in the flour.
The dough will be slightly crumbly but should hold together when pressed. Think damp sand—not sticky, but workable.
Press the dough evenly into the prepared pan. Use the back of a spoon or a flat measuring cup to smooth it out and make sure it’s evenly distributed.
3. Bake the Base
Bake the crust for 18–20 minutes, or until the edges are just starting to turn golden. You’re not looking for deep browning here—just a light, buttery color.
Remove from the oven and let it cool for about 5 minutes.
4. Add the Dulce de Leche
Spread the dulce de leche evenly over the warm crust. It’s thick by nature, so if it’s hard to spread, pop it in the microwave for 20–30 seconds to soften it up.
Take your time here—an even layer makes a big difference.
5. Add Toppings (Optional but Encouraged)
Now’s the moment to sprinkle on sea salt, chocolate chips, or nuts. This step is completely optional, but it’s also where the bars really shine.
6. Chill, Slice, and Enjoy
Let the bars cool completely at room temperature, then transfer them to the refrigerator for 1–2 hours. Chilling helps the dulce de leche set and makes slicing much easier.
Once firm, lift the bars out using the parchment paper and cut into squares. I usually cut them into 16 pieces—but no one’s stopping you from making bigger ones.
My Go-To Dulce de Leche Shortcut
If you ever want to make your own dulce de leche from scratch, here’s the simplest method:
Take a can of sweetened condensed milk, remove the label, and place the unopened can in a pot. Cover it with water by at least an inch. Bring it to a boil, then reduce to a gentle simmer and cook for 2½ to 3 hours, adding more water as needed.
Let the can cool completely before opening it—this part is important. Once opened, you’ll have beautifully thick, golden dulce de leche.
That said, I’ll be honest: I use store-bought dulce de leche most of the time. It’s reliable, delicious, and saves a lot of time.
Flavor Variations to Try
Once you’ve mastered the basic recipe, it’s fun to experiment. Here are a few ideas that never disappoint:
- Chocolate lovers: Add a thin layer of chocolate ganache on top of the dulce de leche.
- Coffee fans: Mix a pinch of espresso powder into the crust.
- Warm spice vibes: Add cinnamon to the base for a cozy twist.
- Crunch factor: Top with toasted nuts or coconut.
- Different texture: Swap the shortbread base for a graham cracker crust.
The key is to let the dulce de leche remain the star.
When to Serve Dulce de Leche Squares
These bars are incredibly versatile. They’re perfect for:
- Holiday dessert trays (they freeze beautifully)
- Birthday parties when you want something easier than cake
- Casual get-togethers or potlucks
- Movie nights when popcorn just isn’t enough
- Or a quiet evening when you need a little comfort
They’re just as welcome at a celebration as they are on a random Wednesday night.
Final Thoughts from My Kitchen to Yours
If there’s one dessert I always recommend when someone wants something easy, impressive, and universally loved, it’s these Dulce de Leche Squares. They’re rich without being complicated, indulgent without being fussy, and guaranteed to make people smile.
Once you make them, don’t be surprised if they become part of your regular rotation. And if you find yourself hiding the pan in the fridge so you can sneak one more square later… well, I completely understand.